May 19, 2011

"Building" a major triad.

Music has lots of patterns.  Patterns are an idea that repeats itself again and again.  Learning to recognize and recreate patterns on the piano is going to help you create music in a beautiful, fun way.  One of the first patterns we see when we look at the piano are the black and white keys.  First three black, then two black keys, repeated all across the keyboard. 


A chord is typically composed of three or four notes.  A major triad is one of the most frequently used chords, so we’re going to dive right in and learn the about “building blocks” for the major triad first.  A triad has three notes in it, just as a tricycle has three wheels, a triceratops has three horns, and a triangle has three sides.  Triads are also made of thirds.  We are going to use blocks to create the same patterns that are in a chord.

First, using blocks, we begin with the foundation.  With your blocks, choose a color to be the base, or root for all of your chords, and set this block aside.  I used green.

 Next we need to build a major third  A major third consists of three blocks you won’t play, and a block on top.  Choose a different color for the top block of a major third, because we’ll be coming back to it.  I used red.


Finally we need to build a minor third.  A minor third is one block smaller than a major third, made with three blocks total.  Choose a third color for your minor thirds.  I used blue.


Now we stack the pieces.  The base goes on the bottom, then, because we are building a major triad, we place the major third on the base first.  Then add the minor third on top.  This is the pattern you will use for building all major triads on the piano.
Now comes the fun part.  Take your blocks to the piano and put your base note on the letter “C”.  One by one, take the blocks off and put them on the next note, left to right.  Do this for black and white notes.  Your played notes should be “E” for the major third, and “G” for the minor third.  So the notes you play for a “C” chord are C, E, and G.  That’s all there is to it!
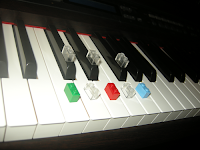
The next step: Try building a chord on F.  You should come up with F, A, and C.  Build it again on G, and you end up with the notes G, B, and D.  These are the primary chords for the key of C, and are the only major triads that have all white notes.  Becoming familiar with these three triads is a great place to start.

Purchasing legos as a teaching manipulative

Welcome to a mini-course about building and working with chords on the piano.  I am excited to share some ideas with you that I have used with my students for about three years, and which has gone over well with them.  My secret?  Using lego blocks to visualize the building process!  Over the next couple of weeks I will be sharing some worksheets, videos, and sample sheet music to introduce this process to your beginning-early intermediate piano students or children.  I purchased these blocks from Lego's Pick A Brick webpage, which is part of their store.  You can raid your children's lego stash, or you can purchase them online.  Purchasing through my link supports this site.

All bricks are 1x2 blocks, and what I purchased included
  • 3 each of light blue, red, and green. (specific colors don't matter)
  • 14 white
  • 10 black
  • 15 transparent (these bricks cost more, but because they will represent notes that are NOT to be played, it helps that they are "invisible".)
Here is a screen-shot of my selecting these bricks.  The total came across to be $9.85 plus $4.95 shipping and handling.

Unable to display content. Adobe Flash is required.


I personally store my blocks in an Altoids tin, which I keep in my piano bag for use during lessons.  It is part of my "tool box", and most of my students love it when I pull these out.

May 16, 2011

Music Notation assignment number six

Jesu, der du meine Seele
Click here for pdf

New skills for this assignment include:
layering, staff spacer, accidental review

Setup:  select key signature with 4 flats, 12 measures.  I chose “piano” for instrumentation.

Step 1: Enter in top notes individually in treble clef.


Step 2: Click on the layer 2 button (numeral 2 in pictured grid)


Step 3: Enter in the alto line beginning in measure one.  Enter in reminder accidentals as you go, such as the G natural in measure 4.

Step 4:  Click on layer 1 again and enter in the tenor line.  Because of the leger line notes that may not be as familiar to you, here are the names of the notes (but not time values) (Many of these notes are actually flatted notes, but because of the key signature, they are flatted by default, and you don’t have to manually make them be flat):

M1: D, C, B, F, E, D, C
M2: B, C, A flat, F
M3: B, B, B, A natural, B
M4: C, B, D, C
M5: F, F, E, E
M6: D, E, F, E, D, C
M7: F, G flat, F, E, D, C, B
M8: E, A, B, C, D
M9: E, F, E, D
M10: G flat, F, F, E natural, F
M11: F, F, B, B
M12: B, A natural, F


Step 5: Click on layer 2 and enter in the bass part.

Step 6: Add the fermatas, which are located in the “Articulations & Ornaments” palette.

Step 7: Changing the staff spacing.  This needs to be done because the beams from the alto line cross the beams in the tenor line at places, such as measure 6, pictured.


In the Breaks and Spacer palette, select the staff spacer.

Drag this spacer to the first measure in the system.  Double click on the icon and drag the spacer down to make  the staff be taller.  This is a tricky step that I learned by an online search when I created this assignment.  I had to play with it a bit, but the end result looked nice.

Step 8:  Change page layout to be letter instead of A4.  Double check each measure to make sure that all of the accidentals are right, and that the reminder accidentals are in place.  You’re done!  And you are almost done with this course!  This is an advanced assignment, so congratulations on getting this far.  If you have any questions, I am happy to help!

May 9, 2011

Music Notation assignment number five

Row, Row, Row Your Boat

New skills for this assignment include:
Copying and pasting, moving text down or up an octave, and hiding empty staves.


Tip:  While copying and pasting measures, it may be helpful to zoom out by selecting 75% or 50% next to the magnifying glass.

Step 1.  Create a new file from scratch.  The title is “Row, Row, Row your Boat.”  Enter “Traditional American Folk Song” in the composer line.  Under vocals, select Soprano, Alto, and Bass.  Keep the default key signature (C).  Change the time signature to 6/8, and choose 16 measures.

Step 2.  Enter in the first eight measures on the soprano line.  Exit note entry mode, click on the first note, and type “ctrl+L” to enter in the lyrics for those eight measures.  Select the first eight measures.  (Do this by double clicking on the first measure until it is surrounded by a blue box.  Hold “shift” down and click on measure eight.)  Now copy the measure by typing “ctrl+C” or with the mouse by clicking on “Edit” in the file menu and then selecting “copy”.


Step 3.  Now select measure three in the alto line.


Paste by either typing “ctrl+V” or go to the file menu paste from the edit menu.  Select measure 9 in the soprano staff and paste again.

Step 4.  Select measure 7 in the bass line and paste.  Note that it enters the notes in the same register as the women’s part.


While the measures are still selected, type “ctrl+down”.  It will make the whole selection drop an octave.

Step 5.  Finishing the alto and bass lines.  You can copy the first four measures and paste it into measures 11-14.  If you don’t copy the measures isolated, it will paste the whole eight measures in, and add measures into your score.  After you have pasted in measures 11-14 in the alto line, manually add the last two measures in the alto and bass lines and add text as shown in the assignment.

Step 6.  Hiding Staves.
In the file menu, Click on “edit general style” under “Style” .  Click on the “Hide Empty Staves” box and click “OK”


You’re done!  Remember that you can change the page settings under “Layout” to be letter size instead of A4.  I always do this because I live in the States, and we print on letter sized paper.

This is a fun one to listen to.   I haven’t formally told you how to do this.  The playback buttons are located under “Help” in the file menu.


The first two buttons are for midi input if you have a keyboard connected to your computer.  This is an awesome feature you can use in Musescore to enter notes into the score by playing them on the keyboard.  The advantages to this are that it will automatically be in the octave that you want it to be in, and it makes it easier to input chords.  I loved this feature when I was at the University and they had the keyboards set up all the time for us, but for home use, I do not use it even though we have all of the hardware to set it up to our clavinova.  If I composed more often, I would, but the note-entry method that I share in this e-course is fast enough for me.  But I digress…

The third button will make you playback from the beginning of the piece.  The fourth button is the play button, and it will play from where you are working, or from the beginning as applicable.  The fifth button will turn on and off any repeats (and similar symbols like codas, etc) that you have entered into the score.

May 4, 2011

Thank you, Crystelle

I want to thank Crystelle Francom for the excellent work she did in creating the art-work for this page. She did it to earn some money for her mission, and I am very pleased with the results.

Originally, she was just drawing children, but they ended up looking very much like my own, and so I am telling my children that that is who they are. Let me introduce them to you. The older boy is Peter, the girl is Helen, and the baby is Patrick. They are a little young for some of the things that I post on this website, but they are the inspiration for all of it, as I hope to give them strong musical foundation.

Thank you again, Crystelle.

May 2, 2011

Music Notation assignment number four

Oh, Susannah
Click here for PDF

New skills for this assignment include:
Slurs, note extensions, chords, pick-up measures, first and second endings, and page layout.


Open a new file.  The song name is “Oh, Susannah”, and the composer is Stephen Foster.  Create a new file from scratch.  The time signature for this piece is 2/2.  Click on the box that says “Pick up measure”, and adjust the settings to say “1/2”.  There are 17 measures.

Step 1.  Enter the notes into the score.  Remember that to make a note dotted, you need to type a period (.) before entering the note.  Remember that you can always undo a mistake by typing “ctrl+Z”.  Redo an action by typing “ctrl+Y”.

Step 2.  Enter the lyrics.  Press “n” to get out of note-entry mode, click on the first note of the score, and type “ctrl+L” enter the lyrics mode.  Type the words in.  When you get to “I’m” right after “Banjo on my knee”, we want to create a note extension.  Do this by typing an underscore (_) for the eighth-note “d”.  There are four times in the lyrics that you will have to do this.


Step 3. Adding a slur.  In the fourth measure, we want to add a note slur for the word “I’m”.  Do this by clicking on “Lines” on the side palette.  It’s the seventh one down.  Click and drag the slur to the middle C, and let go when it is highlighted (turns red).

Step 4.  While you are there, add the first ending to measure 16, and a second ending to measure 17.  Do this by dragging the symbol to the measure and letting go when the whole measure is highlighted.


Step 5. Repeats Symbols.  Add repeats by clicking on the “Barlines” tab on the side palette.  You need a forward repeat sign for the first whole measure, and a backwards repeat sign in measure 16.


Step 6.  Adding chord symbols.  Click on the first note and type “ctrl+K”.  This will let you enter text above the staff for your chords.  Type “C” over the “E” in the first whole measure.  Skip on by hitting the space bar.  In measure two, type “C/E”.  Continue through the score and add all of the chords.  Note: This is a function that liked more in the Finale program.  During playback, it would play these chords for you.  This is a feature that has been requested several times to the Musescore developers, and may be included in a near update.  I’m crossing my fingers for this feature!

You’re done!  There is one more thing that I did with this assignment as I was playing with the layout.  On the top tab, click on “Layout”.  Click on “page settings”.  The default page size is A4.  In the states, we usually print on “Letter” sized paper (8 ½” by 11”).  I selected this and clicked “apply”.  It changed the formatting around a little bit to make the page wider.
Related Posts Plugin for WordPress, Blogger...